Why Audited Projects Are Getting Hacked & How To Avoid It (Invariants)
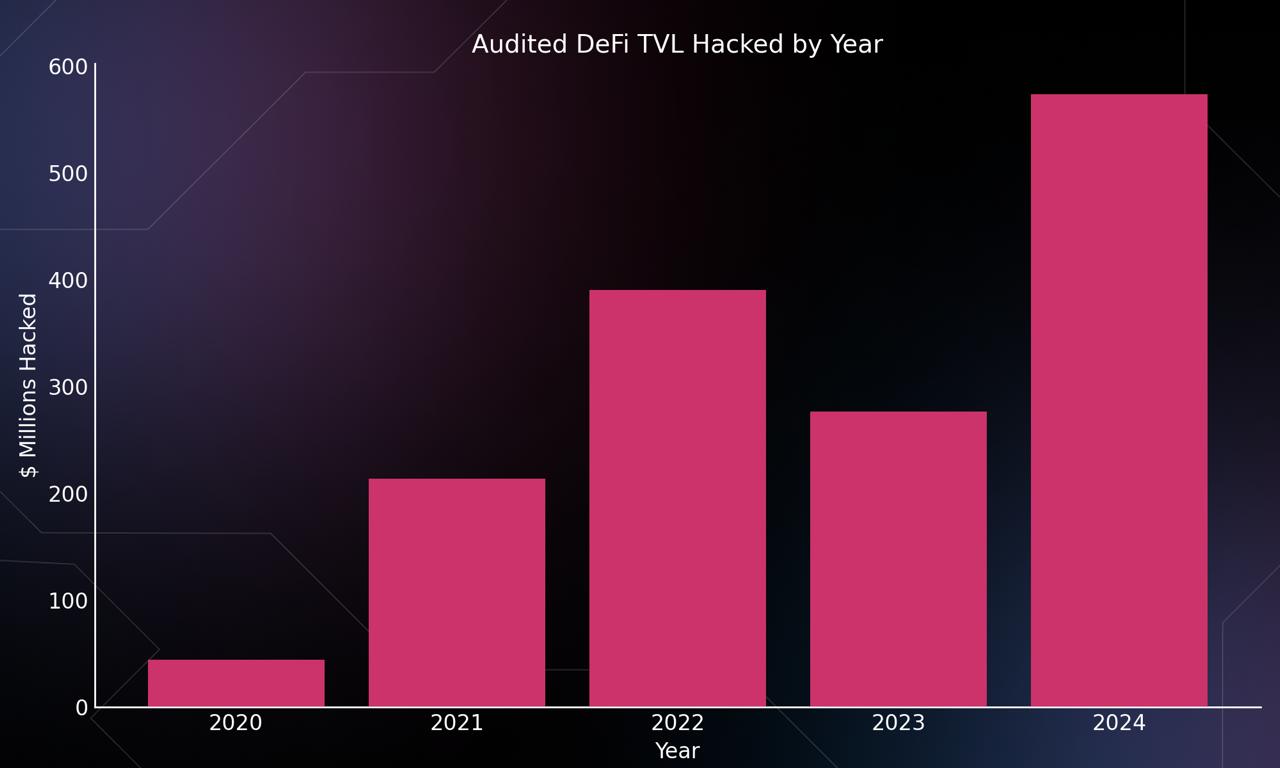
In Today's DeFi landscape, traditional audits are not enough to avoid a devastating exploit, with over $500,000,000 being hacked from audited projects in the last year to prove it.

Recent Audited Projects That Were Exploited
Just in the last year,some audited projects that were exploited and for how much:
- The end tick of an active liquidity position is removed from the bitmap (AMM) → Ticks should only be unset when their liquidity is 0.
- Woofi, $85,000,000
- Socket, $3,300,000
- Velocore, $6,800,000
- Seneca, $6,400,000
- Penpie, $27,000,000
- PrismaFi, $11,600,000
- Unizen, $21,000,000
- DeltaPrime, $5,000,000
- Sonne Finance, $20,000,000
- Hedgey Finance, $44,700,000
- Onyx Protocol, $3,800,000
- Uwulend, $19,400,000
- The list goes on...
All audited, and all hacked. The source of every one of these exploits is human error, which could have been avoided with the correct systems in place.
With this in mind, it is crucial for teams building in DeFi to be mindful of the systems they're relying on, and manage their human error risk accordingly.
The end tick of an active liquidity position is removed from the bitmap (AMM) → Ticks should only be unset when their liquidity is 0.
- Removed from systems
- Cross-checked where unavoidable
What are you doing to track, manage, and remove human error risk to avoid hacks?
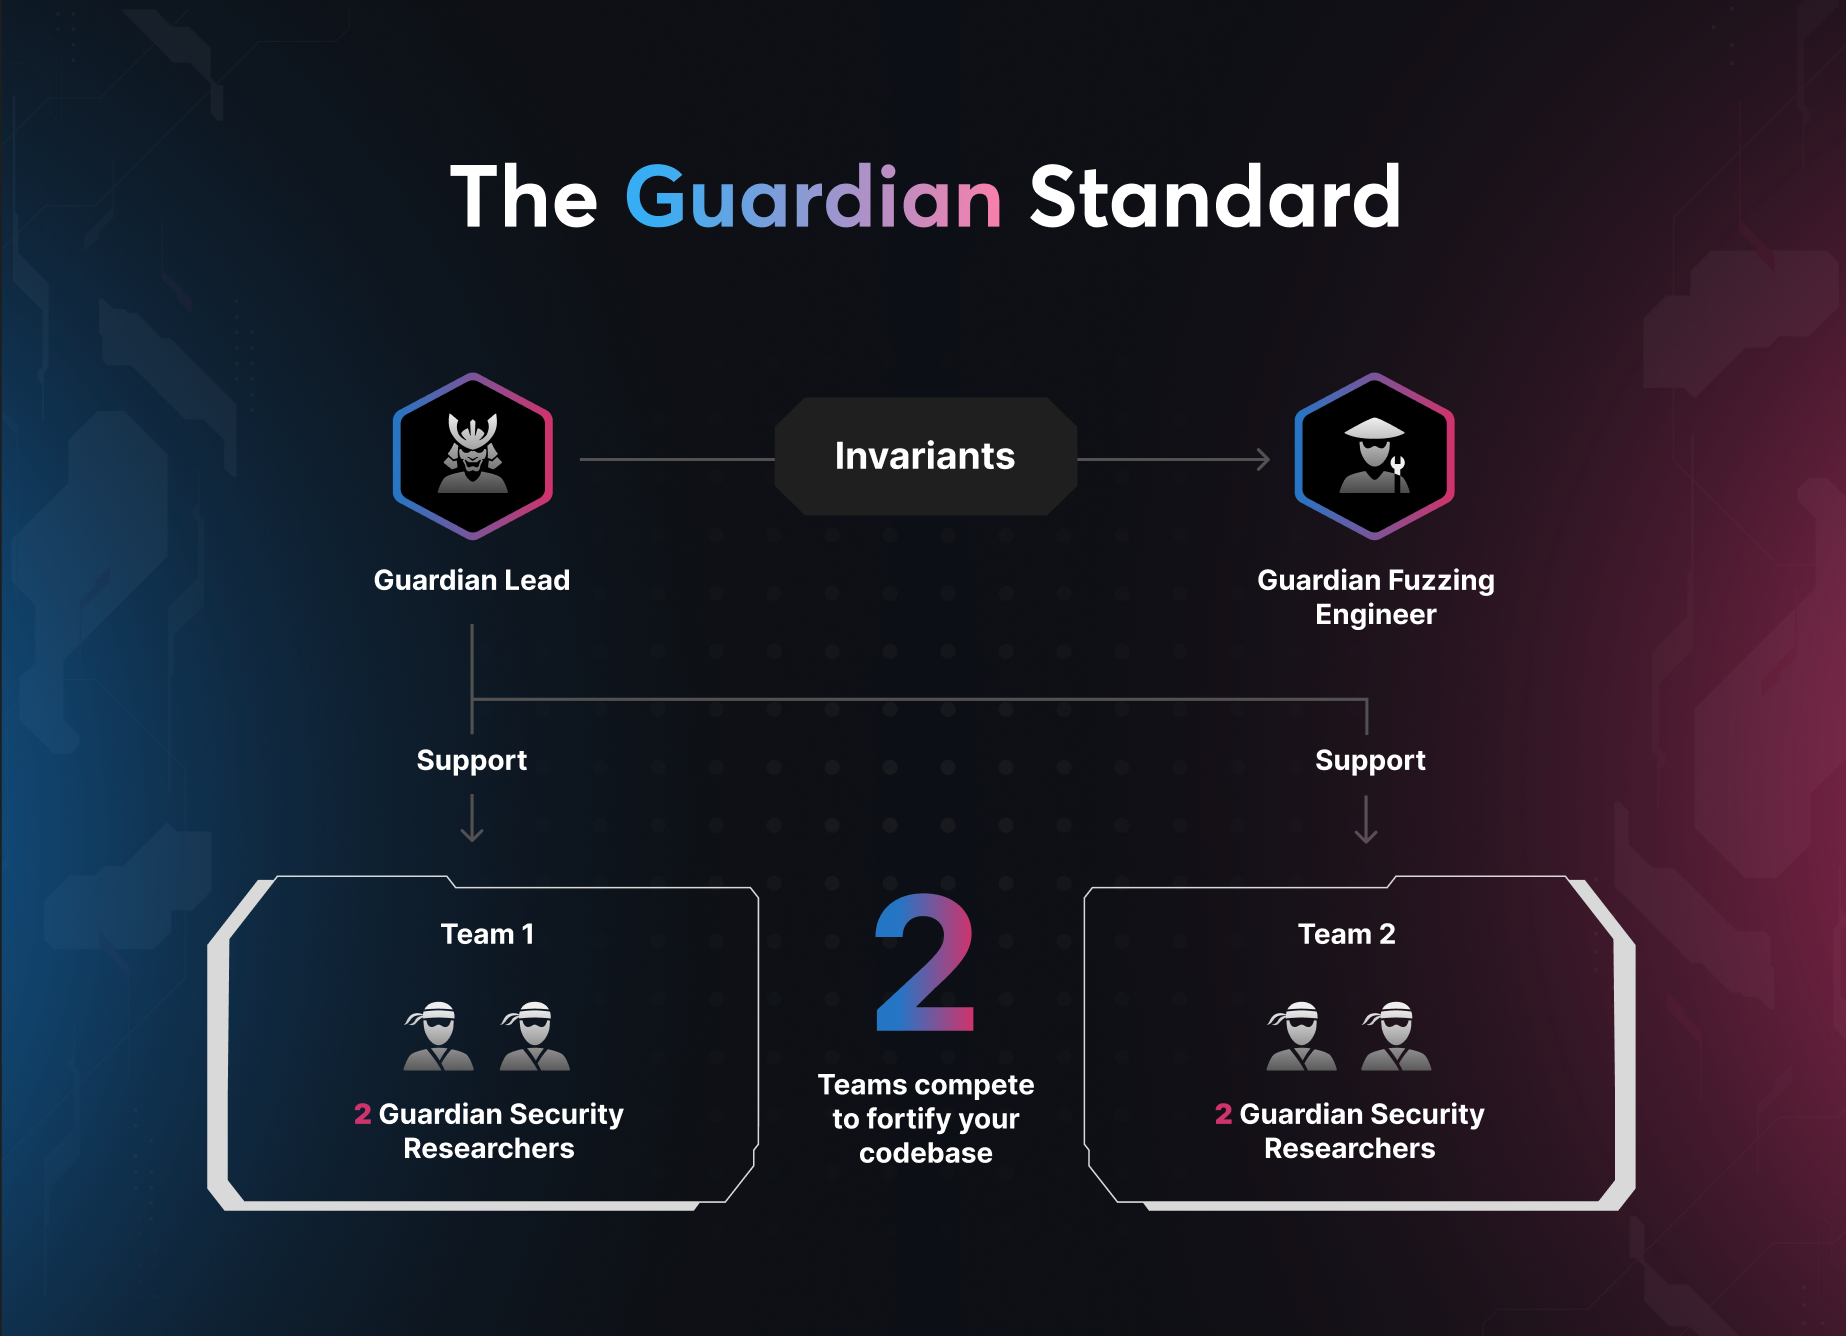
At Guardian we use a two team cross-checking audit model to limit human error in manual analysis.
But more importantly, we implement invariant testing (smart contract fuzzing) as a key security layer to give dependable vulnerability coverage which is not prone to the same human error as manual analysis.
You can implement the same invariant testing yourself, in your own development pipeline, to remove human error and systematically prevent devastating exploits.
So What Is Invariant Testing & Smart Contract Fuzzing?
Invariant testing hinges on two main actions:
- Identifying crucial protocol "Invariants" which should always hold under any circumstance. Think "sum of user tracked balances should always be ≤ contract balance".
- Exploring the entire application state space to verify whether the crucial protocol invariants always hold.
With smart contract fuzzing, we explore the state space of the application by testing the application under millions of randomized, yet targeted, calls in every order, under every circumstance.
Spectacular Results
Here's how invariant testing comes to reality and just some of the results it delivers.
GMX
Since working with Guardian and implementing strong invariant led Smart Contract battle-testing, GMX saw a 99% reduction in bug bounty payouts, going from paying out 7 figures to nearly 0, with no Critical issues making it to production in the last 3 years.
The types of issues prevented by invariant testing can be adept. In a recent review of GMX's GLV liquidity vaults, invariants were used to identify a Critical issue, C-01: GLV Arbitraged With pnlToPoolFactor. This issue relies on a subtle flaw in the pricing mechanism used for GM tokens which can be leveraged to drain the entire GLV vault.
An issue like this could be easily missed with manual analysis, however with the right invariants implemented, detecting and preventing this issue becomes foolproof.
. It's important that this contract inherits all handler contracts (more on handlers in a bit!).
Synthetix
The implementation of invariant testing in Synthetix's Perps V3 market uncovered significant issues such as H-04 which affected live markets and had gone unnoticed by previous auditors.
Furthermore, invariant testing was instrumental in uncovering and eradicating novel rounding issues in Synthetix's BFP market. Without strong fuzzing coverage, gaining confidence in the remediation for a sophisticated rounding issue like this is nearly impossible.
"Having seen many audits over many years, no one even comes close to guardian's approach, and the quality of the audit is unmatched."
Baseline Markets
Before working with Guardian and implementing invariant tests, the Baseline Markets team experienced multiple hacks and failed deployments of their novel AMM liquidity management system.
With an all encompassing fuzzing suite, many novel exploits were uncovered and resolved. Several of which are documented in our blog post on the engagement, ultimately allowing Baseline to successfully launch without any issues.
Now after over a year of flawless production operation, the Baseline team continues to use invariant testing to uncover extremely hard to catch vulnerabilities before production and at the click of a button.
If the user deposits X assets,
Invariant Testing For Your Org
You can implement the same invariant testing and fuzzing approach that we at Guardian use in our audits.
In fact it's crucial to build invariant testing into your development pipeline from the start to remove human error risk and foster an exploit resistant engineering org that stands the test of time.
Even beyond that, some additional benefits from invariant driven development are:
1. Faster feedback loops, boost engineering velocity
With a smart contract fuzzing suite, engineers can simply run a command and immediately receive feedback if a core invariant was broken and a Critical exploit was introduced.
This allows engineers to iterate faster, without waiting for external review to uncover these issues and adjust the design.
2. Smoother security review process, save $50,000+ and weeks in shipping time
Invariant testing catches the hard to spot issues ahead of time, moving their resolution earlier in your development pipeline. This means you go into external audits with battle-tested code, resulting in less necessary changes, less required follow up review, and a higher level of confidence.
This can literally save you weeks of auditing time which translates to tens of thousands of dollars saved.
3. Formalized specs, testable fidelity from spec to implementation
Invariants force you to technically crystalize your product specifications. This results in catching design flaws earlier, and systematically ensuring parity from spec to implementation.
When developing advanced projects, or when orchestrating many projects at once, invariant led design ensures that engineering efforts are made rigorously in line with the vision for the product.
However most importantly, we are adding a systematic approach to vulnerability resistance in the development pipeline. The backbone of any durable engineering organization is the resistance to human error in it's testing and verification systems.
If the user deposits X assets,
Implementing Invariant Testing
Here's everything you need, a distilled breakdown of our approach to invariant testing.
Throughout this guide we'll be using Echidna to "fuzz test" our identified invariants with millions of targeted randomized inputs. Foundry and Medusa are some other frameworks which could be used to fuzz our invariants as well.
We'll walk through each step necessary to get up and running with invariant testing, and then how to dial in your suite for best results:
- bracketfi-fuzz % ./test/fuzzing
- Set Up Handlers
- Optimizing Coverage
- Implementing Invariants
- Debugging Counterexamples
- Getting The Most Out Of Your Suite
Without further ado, we'll begin by identifying the core invariants to be tested.
1. Gather Invariants
When dealing with invariant testing, an invariant is a statement that must always be true
For example:
- If the user deposits X assets, totalDeposited echidna test/fuzzing/Fuzz.sol --contract Fuzz --config echidna.yaml echidna test/fuzzing/Fuzz.sol --contract Fuzz --config echidna.yaml
- If a user successfully submits an order, the user's account must not be liquidatable.
- echidna test/fuzzing/Fuzz.sol --contract Fuzz --config echidna.yaml
- The sum of tracked balances across accounts + fee balances should be ≤ the contract balance
If fuzzing uncovers a scenario in which one of these invariants does not hold, we've uncovered a Critical vulnerability in the protocol.
The first step to set up invariant testing for your protocol is .... drumroll please .... figuring out which invariants to test. Here are two simple questions to get a bunch of invariants going:
- For each function, what state variables are affected and what should be their respective change? An additional benefit of logical coverage is introspection into how many times a case is covered, which can give you a measuring stick for the efficiency of your suite.
-
For the system as a whole, what relationships between state variables must always hold?
- The sum of each user's balance must match the totalSupply.
You can identify additional invariants by listing everything that can go wrong with your Smart Contracts and inverting these cases.
- The end tick of an active liquidity position is removed from the bitmap (AMM) → Ticks should only be unset when their liquidity is 0.
- Malicious actors arbitraging automated liquidity movements in the protocol (Liquidity manager) → There should be no profit realized from arbitrary swaps before and after interactions with the protocol.
- The on-chain oracle reported price of a collateral token could be manipulated to cause liquidations (Lending) → There should be no possible stepwise jumps in the price of the collateral token.
- Users accounts go insolvent and create bad debt (Perps, lending, etc...) → With liquidations being carried out on time, there is no way for an account's debt to exceed it's collateral.
Aggregate at least a dozen of the most important invariants for your project. The more the better, the quality of your invariant testing is the quality of your invariants and the quality of your coverage.
You can see some examples of identified invariants in our Baseline Markets, Synthetix BFP Market, and GMX V2.1 reviews.
As long as you have the right invariant and perfect coverage, you can catch any bug automatically.
Now that you have all the assertions ready for your suite, it's time for the setup.
3. Framework Setup and File Structure
The next step is to setup the file structure for Echidna to properly fuzz your contracts inside a fuzzing directory within your typical codebase's test directory.
You can find the standard file structure below from an existing suite Guardian made for BracketFi to secure their LST vaults:
bracketfi-fuzz % ./test/fuzzing
├── FoundryPlayground.sol
echidna test/fuzzing/Fuzz.sol --contract Fuzz --config echidna.yaml
├── FuzzAdmin.sol
echidna test/fuzzing/Fuzz.sol --contract Fuzz --config echidna.yaml
├── FuzzBrktETH.sol
├── FuzzGuided.sol
├── FuzzSetup.sol
├── helpers
│ ├── BeforeAfter.sol
│ ├── FuzzStorageVariables.sol
│ ├── Postconditions
│ │ ├── PostconditionsBase.sol
│ │ ├── PostconditionsBracketVault.sol
│ │ └── PostconditionsBrktETH.sol
│ └── Preconditions
│ ├── PreconditionsAdmin.sol
│ ├── PreconditionsBase.sol
│ ├── PreconditionsBracketVault.sol
│ └── PreconditionsBrktETH.sol
├── properties
│ ├── Properties.sol
│ ├── PropertiesBase.sol
│ ├── PropertiesDescriptions.sol
│ ├── PropertiesReverts.sol
│ └── Properties_ERR.sol
└── utils
├── FunctionCalls.sol
├── FuzzActors.sol
└── FuzzConstants.sol
Without an already prepared framework this can take hours that you could spend time doing the fun stuff .... finding vulnerabilities. That's why we're giving you our Universal Fuzzing Framework that you can simply plug-n-play into the test/fuzzing folder to setup your invariant suite.
Feel free to clone and use it within your invariant tests here:
https://github.com/GuardianOrg/UniversalFuzzing
Here are the most important aspects of this file structure applicable to any protocol:
- Fuzz.sol - This file is the entrypoint file for Echidna to begin a fuzzing run with command echidna test/fuzzing/Fuzz.sol --contract Fuzz --config echidna.yaml. It's important that this contract inherits all handler contracts (more on handlers in a bit!).
- FuzzGuided.sol - This file may contain handler functions that can call multiple protocol actions at once to "guide" Echidna to find a particular state.
- FuzzSetup.sol - This file is where all protocol contracts are deployed and configured.
- helpers/BeforeAfter.sol - This file is used to snapshot the state before a protocol action and after a protocol function so it can be used for your invariant assertions.
- helpers/Postconditions/ - This folder contains all the suite invariants you'd like to verify after a particular protocol action.
- helpers/Preconditions/ - This folder contains all the suite invariants you'd like to verify before a particular protocol action, as well as filtering the input parameters to ensure the fuzzer provides the most amount of valid calls for a set of runs.
- properties/ - This folder contains the implementation of assertions for all of the invariants you'd like to verify.
- utils/FunctionCalls.sol - This file contains the low-level calls to your protocol.
- utils/FuzzConstants.sol - This file contains any useful constants and config variables to be used throughout the invariant suite.
2. Set Up Handlers
Once you've identified your protocol invariants, the next step is to create handlers that simulate randomized interactions with your protocol. Handlers act as controlled entry points for the invariant testing framework to stress-test the system, ensuring our invariants hold under millions of protocol states.
We are going to create handler contracts for each entrypoint contract, and within these handler contracts, handler functions for each external function which can be used to interact with your protocol in some way.
For example, in the file tree structure above for the Bracket suite the following are all handler contracts:
- FuzzAdmin.sol
- FuzzBracketVault.sol
- FuzzBrktETH.sol
- FuzzGuided.sol
These contracts are made up of handler functions, which handle the interaction between the fuzzer and the protocol. Each handler function is created in the following format:
- Before - Snapshot the values of state variables before the function is called and bound function inputs.
- Action - Call the function
- After An additional benefit of logical coverage is introspection into how many times a case is covered, which can give you a measuring stick for the efficiency of your suite.
// SPDX-License-Identifier: MIT
pragma
solidity ^0.8.0;import
"./helpers/preconditions/PreconditionsBracketVault.sol";import
"./helpers/postconditions/PostconditionsBracketVault.sol";import
{IBracketVault} from "src/IBracketVault.sol";contract
FuzzBracketVault is PreconditionsBracketVault, PostconditionsBracketVault {// deposit
function
fuzz_deposit(uint256 assetsSeed) public setCurrentActor {// BEFORE
DepositParams memory params = depositPreconditions(assetsSeed);
address[] memory actorsToUpdate = new address[](1);
actorsToUpdate[0] = currentActor;
_before(actorsToUpdate);
// ACTION
(bool success, bytes memory returnData) = _depositCall(params.assets);
// AFTER
depositPostconditions(success, returnData, actorsToUpdate, params.assets);
}
// withdraw
function
fuzz_VaultWithdraw(uint256 amountSeed, uint256 saltSeed) public setCurrentActor {// Before
WithdrawParams memory params = withdrawVaultPreconditions(amountSeed, saltSeed);
address[] memory actorsToUpdate = new address[](1);
actorsToUpdate[0] = currentActor;
_before(actorsToUpdate);
// ACTION
(bool success, bytes memory returnData) = _withdrawCall(params.amount, params.salt);
// AFTER
withdrawPostconditions(success, returnData, actorsToUpdate, params);
}
}
The job of each function call in the above fuzz_deposit function is:
depositPreconditions
- Translate the random inputs to values which are possible for the protocol, in this case assetsSeed to a supported asset with a random deposit amount.
- Take a snapshot of the state of the protocol before the deposit action takes place.
_depositCall
- Make the deposit into the protocol contracts.
depositPostconditions
- Snapshot the state of the protocol after the deposit action.
- Assert protocol invariants, utilizing the before state and after state and return result of the deposit action.
With the above handler format, you can create a handler function for every state-changing function in your protocol, to allow the fuzzer to simulate user interaction with these actions.
Once your fuzzer contract is set up with your handler functions, we can run Echidna on the Fuzz contract to interact with all necessary protocol entrypoints.
In our case, we run echidna test/fuzzing/Fuzz.sol --contract Fuzz --config echidna.yaml in our terminal and see the following:

3. Optimizing Coverage
If the fuzzer appears like it's working but it is not actually triggering any protocol actions, the fuzzer is effectively useless. This is why after running your testing suite, it is crucial to ensure the fuzzer is achieving good coverage and hitting the necessary lines we need.
Luckily most frameworks produce a handy coverage report for us to examine. In Echidna, these coverage files are generated after each fuzzer run in the corpus directory.
Echidna is triggering the handler functions and calling the protocol to verify all created assertions.
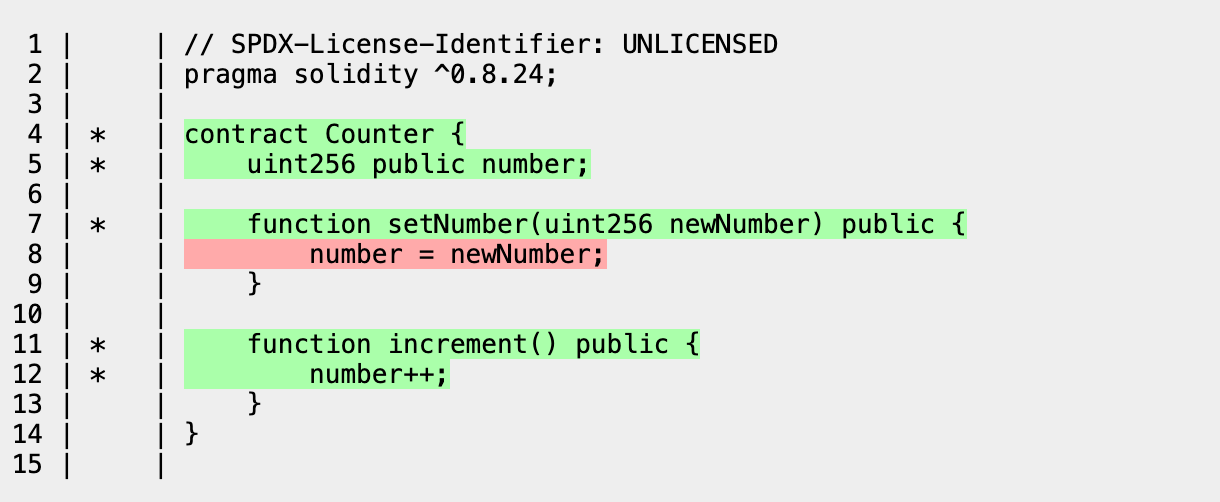
In the above, we notice that:
- Function increment is being fully entered and we have proper coverage for it
- Function setNumber is not being entered and we do not have coverage for it. To solve this, we just need to make a handler function that triggers setNumber
In a more complex DeFi protocol, line coverage becomes extremely satisfying:
4. Implementing Invariants
Once we have the structure setup and the necessary line coverage from our handlers, the fun really starts!
Now it's about implementing all the invariants we came up with originally, adding them to the post-conditions of our handler functions, and letting the fuzzer find all those edge cases you're worried about.
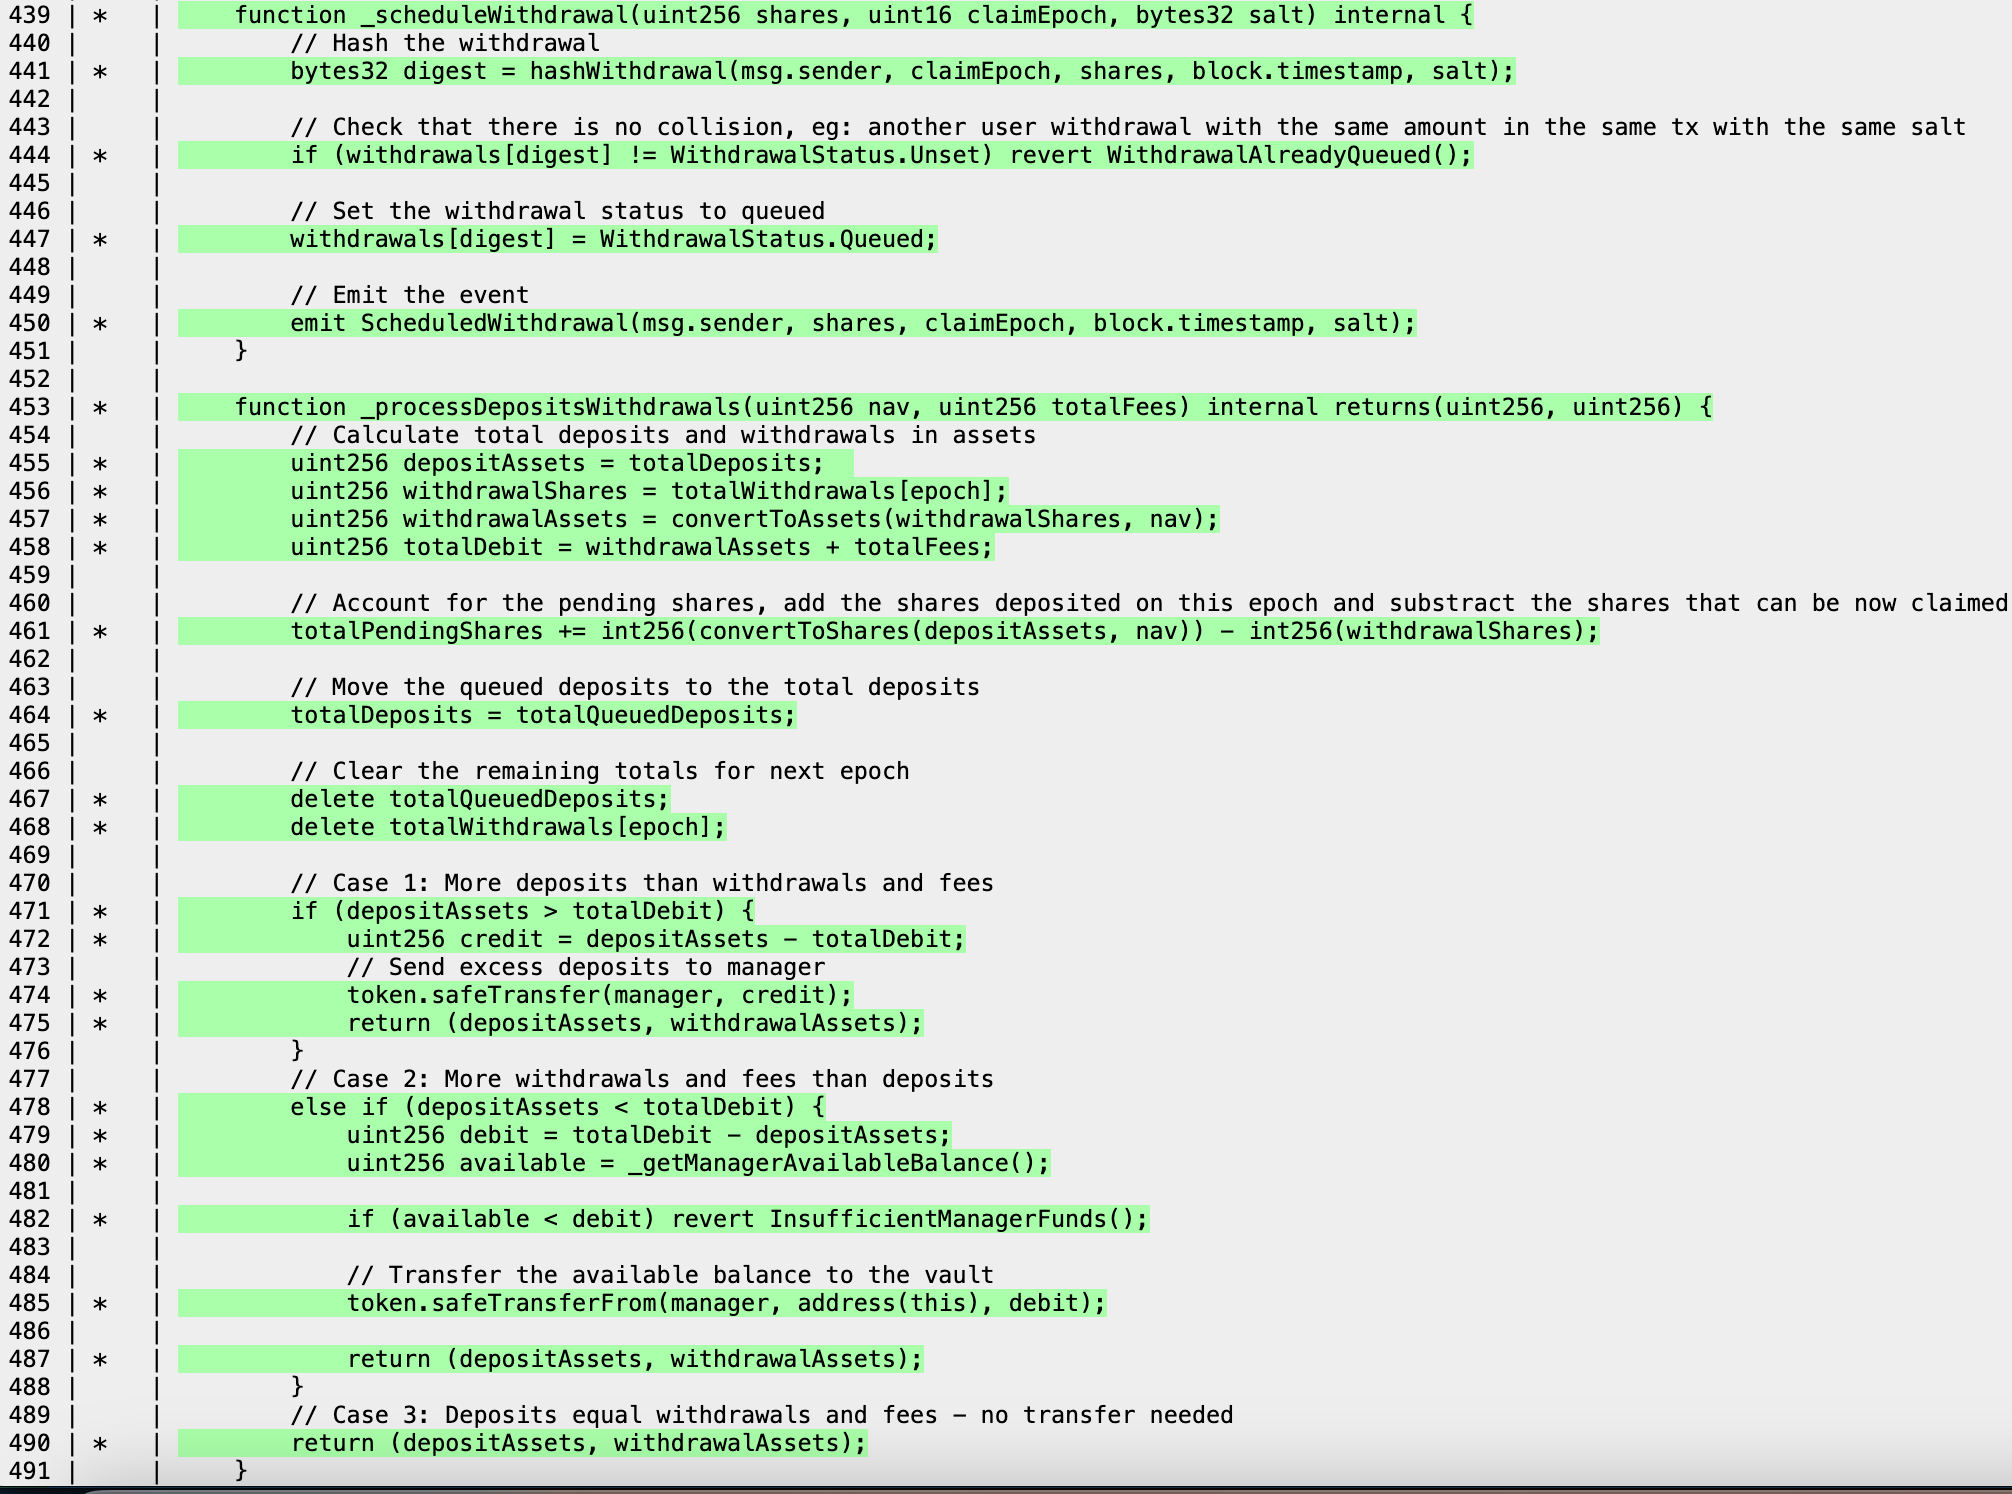
Let's examine how invariants are implemented with the fuzz_deposit handler function:
// deposit Handler function
function
fuzz_deposit(uint256 assetsSeed) public setCurrentActor {DepositParams memory params = depositPreconditions(assetsSeed);
address[] memory actorsToUpdate = new address[](1);
actorsToUpdate[0] = currentActor;
_before(actorsToUpdate);
(bool success, bytes memory returnData) = _depositCall(params.assets);
depositPostconditions(success, returnData, actorsToUpdate, params.assets);
}
// FunctionCalls.sol
event
DepositCall(uint256 assets);// Deposit function call used in the handler function
function
_depositCall(uint256 assets) internal returns (bool success, bytes memory returnData) {emit DepositCall(assets);
vm.prank(currentActor);
(success, returnData) = address(bracketVault).call(abi.encodeWithSelector(BracketVault.deposit.selector, assets));
}
// PostconditionsBracketVault.sol
// Snapshot after state and run invariants
function
depositPostconditions(bool success,
bytes memory returnData,
address[] memory actorsToUpdate,
uint256 amount
) internal {
if (success) {
internalAccounting += amount;
// Record the deposited assets for the current user in the current epoch
uint16 currentEpoch = bracketVault.epoch();
userAssetsPerEpoch[currentActor][currentEpoch] += amount;
_after(actorsToUpdate);
onSuccessInvariantsGeneral(returnData);
} else {
onFailInvariantsGeneral(returnData);
}
}
Let's take a deeper look into the depositPostconditions where the invariants are actually ran:
// PostconditionsBase.sol
function
onSuccessInvariantsGeneral(bytes memory returnData) internal {invariant_GLOB_01();
invariant_GLOB_02();
invariant_GLOB_03();
invariant_GLOB_04();
invariant_GLOB_05();
invariant_GLOB_06();
invariant_GLOB_07();
invariant_GLOB_08();
invariant_GLOB_09();
invariant_GLOB_11();
}
function
onFailInvariantsGeneral(bytes memory returnData) internal {invariant_ERR(returnData);
}
The deposit post-conditions has two paths depending on whether the deposit function call to the protocol was successful or not:
- If successful, snapshot the state changes with the _after function and run the invariants contained within onSuccessInvariantsGeneral
- If reverted, run the invariants within onFailInvariantsGeneral to ensure the revert is not a DoS vector we should be concerned about.
Upon success, we validate nearly a dozen protocol invariants to ensure the system is functioning appropriately after every deposit, no matter how many or which actions took place prior.
Now that we understand the structure, let's implement a deposit-specific invariant together!
Here's an assertion that's handy: After a deposit, the balance of assets in the Vault must never decrease.
Now we just have to implement it and let Echidna do it's thing 🚀
We can create a Properties_DEP.sol file to contain invariants specific to the deposit flow and define our invariant:
pragma
solidity ^0.8.0;import
"./Properties_ERR.sol";contract
Properties_DEP is Properties_ERR {// =======================================================
// Deposit Properties (DEP)
// =======================================================
function
invariant_DEP_01() internal {fl.gte(states[1].vaultState.tokenBalance, states[0].vaultState.tokenBalance, "DEP-01: Vault balance must never decrease after deposit");
}
}
Notice how we can trivially use our snapshotted states from the BeforeAfter.sol file to compare the vault balance after the deposit (index 1), against the vault balance before the deposit (index 0).
Next, update Properties.sol to include deposit invariants
contract
Properties is Properties_ERR, Properties_DEP {...
}
Finally, the newly defined invariant_DEP_01 function is available to use in depositPostconditions:
function
depositPostconditions(bool success,
bytes memory returnData,
address[] memory actorsToUpdate,
uint256 amount
) internal {
if (success) {
internalAccounting += amount;
// Record the deposited assets for the current user in the current epoch
uint16 currentEpoch = bracketVault.epoch();
userAssetsPerEpoch[currentActor][currentEpoch] += amount;
_after(actorsToUpdate);
+ invariant_DEP_01();
onSuccessInvariantsGeneral(returnData);
} else {
onFailInvariantsGeneral(returnData);
}
}
And that's it! Now the fuzzer will be verifying invariant_DEP_01 each time a successful deposit occurs. 🤝
5. Debugging Counter Examples
You're running the fuzzer in hopes of catching a sneaky edgecase ... and finally the Echidna UI pops up with a counterexample!
At this moment, it's crucial to understand how to debug the failed assertion. Failed assertions stem from one of two cases:
- Faulty assertion formulation or state capture — Fuzzing suite issue
- Protocol bug/vulnerability — Source code issue
It's important to carefully examine both to get the root cause of the counterexample.
Assume we got the following counterexample:
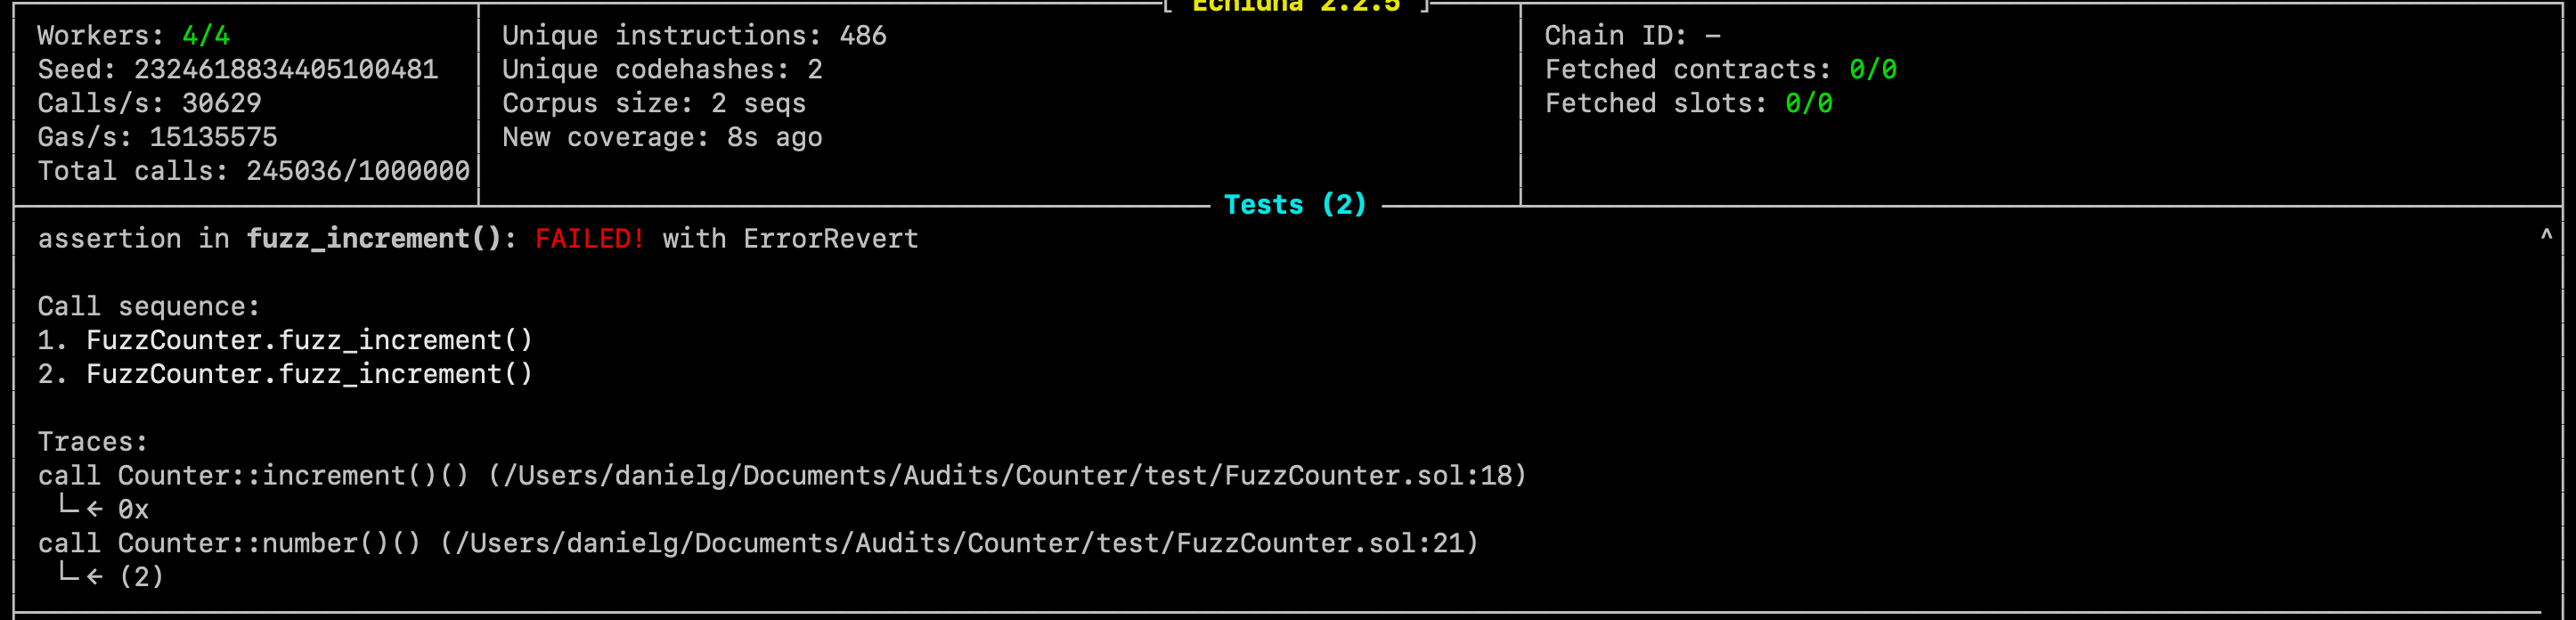
Immediately you should gather the following information:
- Which assertion failed?
- What is the state of the before and after that triggered the failure?
To help us identify the issue, we'll use events to debug which Echidna will include in the trace.
contract
FuzzCounter {Counter counter;
constructor
() {counter = new Counter();
}
event
DebugNumber(string s, uint beforeNum, uint afterNum);function
fuzz_increment() public {// BEFORE
uint256 numberBefore = counter.number();
// ACTION
(bool success, bytes memory returnData) = address(counter).call(abi.encodeWithSignature("increment()"));
// AFTER
uint256 numberAfter = counter.number();
// ASSERT
emit DebugNumber("Number must be incremented by 1:", numberBefore, numberAfter);
assert(numberAfter == numberBefore + 1);
assert(success);
}
}
If we run the fuzzer again, we should see the event with our necessary values:

Echidna shows us that the snapshotted number before was 0 even after two increment calls, as if the numberBefore never got incremented on the first fuzz_increment in the call trace.
With this hint, we can examine the numberBefore within our handler and notice that it was not actually being set (happens more often than you'd think): uint256 numberBefore;
Lucky for us, this should be a straightforward fix, and once it is implemented we can re-run Echidna and see that the assertion is now upheld!
Foundry Debugging
Many times you'll receive a long and complicated call sequence which uncovered a counter example:
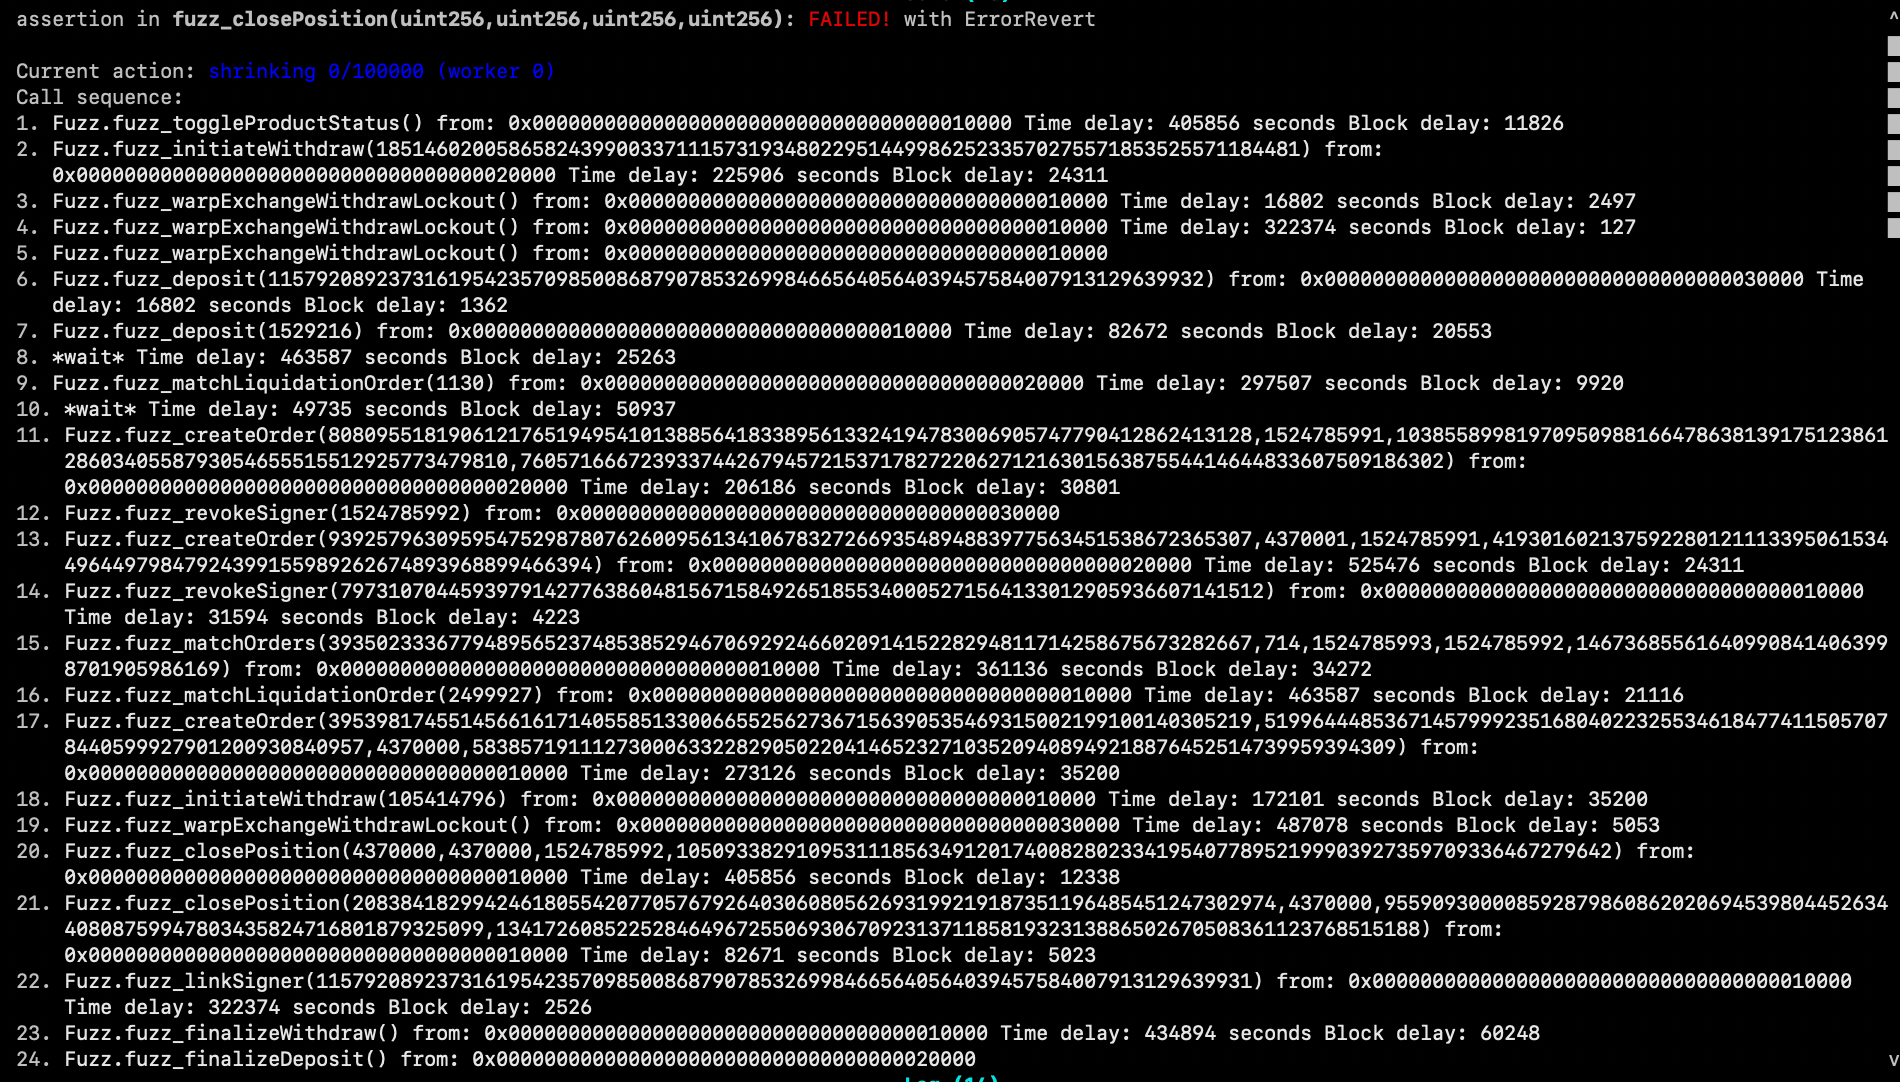
For such complicated call sequences it is sometimes useful to distill the sequence into a foundry test to debug. This can be done automatically using our reproducer script. By including your call sequence in that script, you will receive a formatted foundry test which exactly reproduces the counter example you received.
The output from this script can be run in a simple FoundryPlayground contract in the suite directory:
// SPDX-License-Identifier: MIT
pragma
solidity ^0.8.0;import
"{DecimalMath} from \"../../src/share/DecimalMath.sol\"";import
"./FuzzGuided.sol";contract
FoundryPlayground is FuzzGuided {using DecimalMath for int128;
using DecimalMath for int256;
function
setUp() public {vm.warp(1524785992); // echidna starting time
fuzzSetup();
}
function
test_replay() external {// ...
}
}
A short video going over the reproducer script workflow:
6. Getting The Most Out Of Your Suite
At this point we have an operational fuzzing suite that triggers your protocol's functions and ensures the invariants are maintained under millions of protocol states. To push our fuzzing capabilities even further, there are a handful of improvements to be made:
Reverts As Invariants
Unexpected reverts are a failure mode omnipresent in every DeFi application, and they can be turned into fantastic invariants which are unbelievably good at sniffing out subtle logic and accounting bugs.
You should be made aware of every kind of revert and circumstance that leads to a revert in your smart contracts. Add invariant assertions for the success of your protocol's function invocations, and whitelist the exact reverts you are already aware of.
Here's an example of how unexpected revert assertions can be implemented from our G8keep suite:
vm.prank(d.from);
pairedToken.transfer(address(d._uniswapV2Pair), amountIn);
vm.prank(d.from);
try d._uniswapV2Pair.swap(amountIn, amountOut, d.to, "") {
} catch (bytes memory err) {
bytes4[3] memory expectedErrors = [
g8keepToken.InsufficientBalance.selector,
g8keepToken.InsufficientPoolInput.selector,
g8keepToken.ExcessiveAmountOut.selector
];
bool expected = false;
for (uint256 i = 0; i < expectedErrors.length; i++) {
if (expectedErrors[i] == bytes4(err)) {
expected = true;
break;
}
}
fl.t(expected, FuzzLibString.getRevertMsg(err));
}
}
disableSlither: true
Logical Coverage
Earlier we discussed optimizing your suite's coverage by examining the line coverage reports produced by your framework. Logical coverage takes this a step further and allows you to measure your suite's coverage of the application state space in a more sophisticated way.
Sometimes you might see that you are getting coverage for e.g. a liquidation, but are you getting coverage of a liquidation of a short position? Logical coverage allows you to measure this.
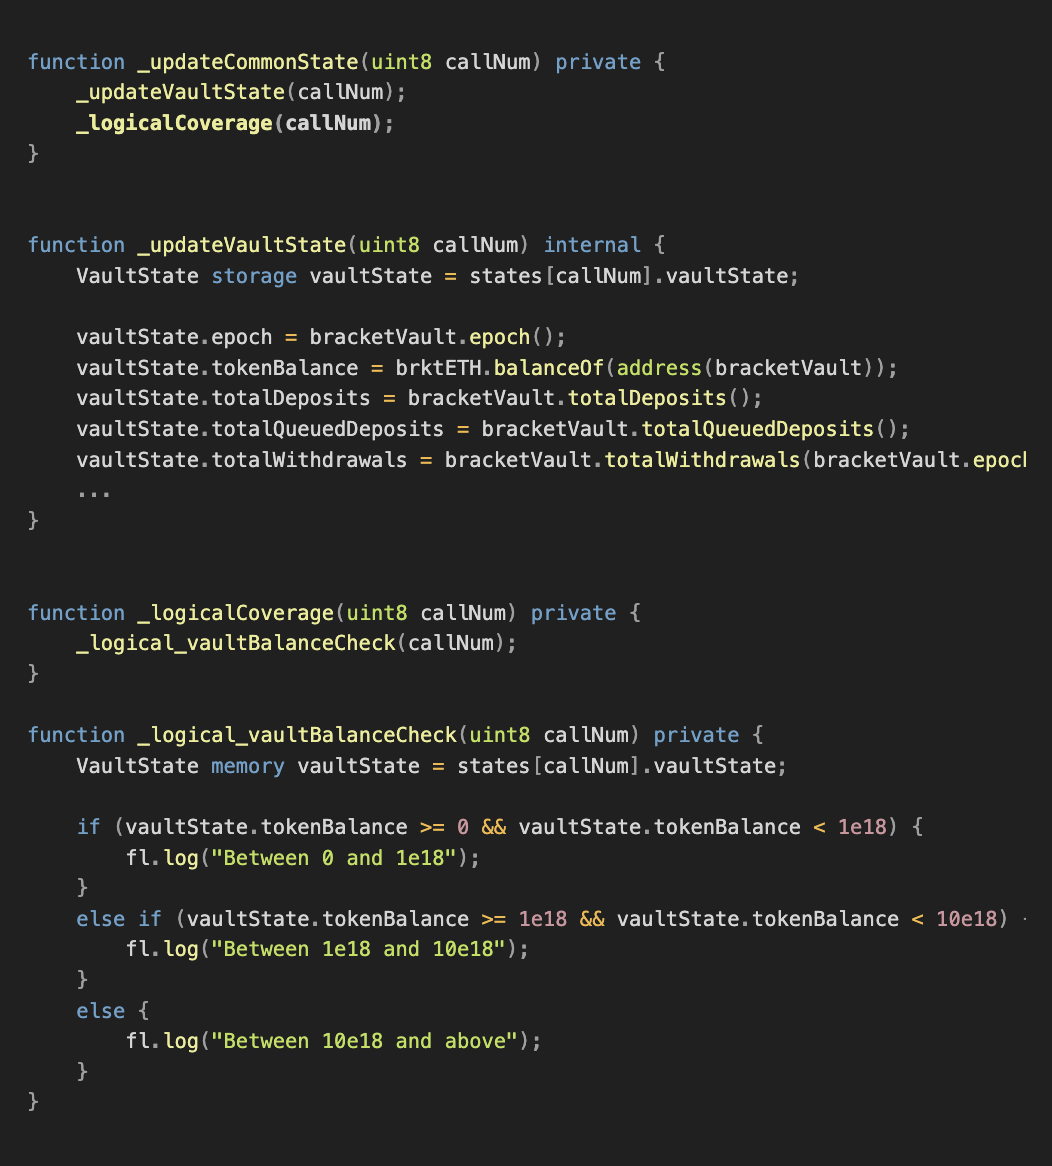
An additional benefit of logical coverage is introspection into how many times a case is covered, which can give you a measuring stick for the efficiency of your suite.
Cloud Fuzzing
Local machines can only do so much before they turn into an oven. You need seamless cloud infrastructure to fuzz your invariants all day and night long for millions and millions of runs.
CI/CD
Once you have an operational fuzzing suite, it can be implemented as part of your CI/CD pipeline, to ensure even the slightest changes are battletested. Often even the smallest changes can lead to the most Critical bugs.
Additional Tips and Tricks
Faster Development
While the suite is in development, you may want to disable Slither, which is a static analyzer that helps guide Echidna under the hood. This is great to have when you're fully setup and running for breaks, but during development it can really slow down testing new handlers if the codebase is large.
To get around the Slither waiting time, in Echidna 2.2.6+ a new configuration was introduced, which you can simply place within your echidna.yaml file:
disableSlither: true
Cheatcodes
Echidna supports HEVM cheatcodes to allow for seamless chain manipulation such as pranking, warping, rolling, etc. that we love from Foundry.
In order to support these cheatcodes in your Echidna invariant suite, firstly install the following library:
https://github.com/crytic/properties
Once the library is installed on your repo, simply import HEVM within your fuzzing suite:
import "@crytic/properties/contracts/util/Hevm.sol";
Now you can use the cheatcodes within your assertions and allow the fuzzer to dig into those pesky states requiring different actors, certain blocks, etc.
Correct block.timestamp and block.number
Contrary to common belief, Echidna does not begin making calls from a block.timestamp and block.number of 1. Instead, the initial block.timestamp is 1524785992 and the initial block.number is 4370000.
This is absolutely crucial to know when your fuzzing suite relies on timestamps. For example, when dealing with Oracle updates, a situation may arise where the fuzzer is continuously stuck on a staleness check. In this specific case you can warp time when making the oracle update to remedy the issue.
Furthermore, this knowledge is necessary for your Foundry reproducers to mimic Echidna's call sequence one-to-one. Otherwise, the test may not hit the right conditions to trigger and consequently debug the failed assertion.
Conclusion
Phew... now you've got everything you need to build a rigorous standard for your Smart Contracts and adopt a systematic defense against tricky bugs and vulnerabilities.
We covered:
- Ideating invariants for your specific protocol
- Implementing handlers for your system entry points
- Running handlers and fuzzing with Echidna
- Getting perfect coverage with the right feedback loop
- Implementing assertions correctly
- Debugging counter examples
- Getting the most out of your suite with powerful revert assertions, logical coverage, cloud fuzzing, and CI/CD
- Additional Tips, tricks, and common debugging steps
Learning and implementing all of these things is not easy, but it's well worth it in the long run for increased developer velocity, massive time and money savings, and most importantly to catch human errors and prevent bugs and vulnerabilities for years to come.
Ready to implement invariant testing for your protocol?
Get started with our Universal Fuzzing Framework or contact Guardian for a comprehensive security review.